Tools
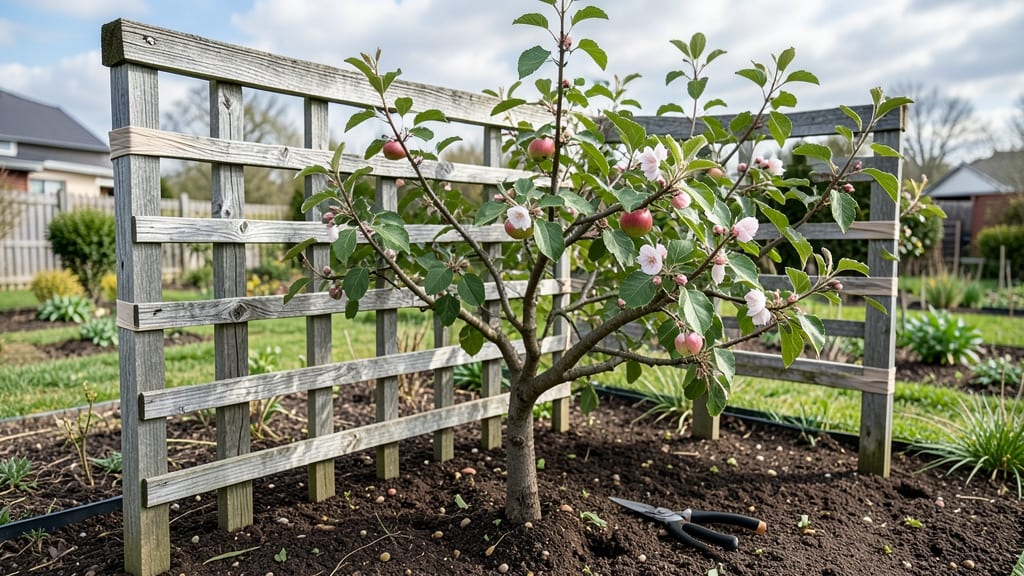
An espalier apple tree trellis turns your small yard into a mini orchard without sacrificing space. 🌳 I first saw this technique in a medieval garden—where monks trained fruit trees against stone walls to maximize harvests in tight quarters.
The same principles work today, letting you grow gourmet apples along fences, walls, or even arbors while keeping the fruit within easy reach.
The magic happens when you shape the tree into flat, open patterns—like fans, candelabras, or horizontal layers—using a sturdy trellis. You’ll save 70-80% of the space a standard tree needs while still getting full-sized fruit.
Plus, the trellis doubles as a decorative element, blending form and function in ways that make neighbors do double takes. My own espaliered Honeycrisp produces more apples per square foot than my full-sized trees.
Picture this: crisp, sun-kissed apples hanging at chest height, their branches forming geometric art against a brick wall. The trellis itself can be as simple as wooden stakes or as elegant as wrought iron arches—it’s all about matching the design to your garden’s style.
You’ll harvest with less strain on your back, enjoy easier pruning, and create a focal point that looks stunning year-round, from blossoms to fall color.
Works for urban patios, cottage gardens, or even modern minimalist spaces. The key is starting with the right trellis materials—galvanized metal, cedar, or even repurposed lattice—and training the tree while it’s young. Let’s get those branches growing in the right direction from day one.
📚 In This Guide
- What you need
- Instructions
- Tips and common mistakes
- Wrapping up and next steps
What you need
- ● Apple tree sapling: 1 dwarf or semi-dwarf variety (e.g., Gala, Granny Smith, or Honeycrisp) for compact growth.
- ● Trellis system: Horizontal wires: 3–5 galvanized steel or coated wires (16–18 gauge), spaced 12–18" apart vertically.
- ● T-posts or stakes: 4–6 sturdy 2" x 2" wooden posts (6–8 ft tall) or metal T-posts for durability.
- ● Crossbars: 2 horizontal wooden/metal bars (1" x 2") to anchor wires at the top/bottom.
- ● Fasteners: Heavy-duty zip ties, wire staples, or screw-in wire clips (galvanized for longevity).
- ● Pruning tools: 1 pair bypass pruners (for clean cuts).
- ● 1 pruning saw (for thicker branches).
- ● Support ties: Soft tree ties or stretchy fabric strips (avoid wire—it can damage bark!).
- ● Soil amendments: Compost or slow-release fertilizer to boost root growth.
- ● Drip irrigation kit: For consistent watering without overhead spray (fungus prevention!).
- ● Mulch: Wood chips or straw to retain moisture and suppress weeds.
- ● Decorative elements: Painted trellis panels or climbing roses for a garden-art vibe.
Step-by-step instructions for building an espalier apple tree trellis
Here's how to create a sturdy, functional trellis that transforms your apple tree into a space-saving masterpiece.
🪴 Step 1: Select and Prepare the Trellis Structure
Start with a strong, weather-resistant frame—I recommend galvanized metal or treated wood for durability. For a 4-foot tall espalier, build a rectangular frame using 2x4s for vertical posts and 1x4s for horizontal supports. Space the vertical posts 6 feet apart to support the tree's weight as it grows. Angle the top slightly outward to encourage natural growth patterns.
Attach horizontal branches every 12 inches vertically and 18 inches horizontally to create a grid. This grid will guide your tree's branches into a flat, fan-like shape. Use staple guns or screws to secure the branches firmly—your tree will lean on them as it matures. If using metal, opt for powder-coated steel to prevent rust.
☀️ Step 2: Train the Young Apple Tree
Choose a 1-2 year old apple tree with a straight central leader (main stem). Plant it 6-8 inches from the trellis so you can easily weave branches through the grid. Prune the central leader to 36 inches tall in early spring to encourage lateral branching. This is where the artistry begins—select 3-4 strong, evenly spaced branches to become your primary scaffold.
Gently bend each chosen branch to follow the trellis wires or horizontal supports. Secure them with soft tree ties (never wire—it can girdle the bark). Space the branches 12-18 inches apart along the trellis. You'll see new growth spurt from the sides of these branches in 4-6 weeks—these will become your secondary scaffold. Here's the thing: patience is key. Don't rush the training; let the tree adjust naturally.
✂️ Step 3: Prune and Maintain the Espalier Shape
Every late winter or early spring, prune to refine the shape. Remove any crossing branches or those growing inward—these create congestion and reduce fruit production. Cut back overly vigorous growth to maintain the flat plane. For a fan-shaped espalier, keep branches horizontal and spread evenly across the trellis. If a branch grows too long, prune it back to a bud facing outward to encourage bushier growth.
Watch for water sprouts (vertical shoots) and suckers (shoots from the base)—these steal energy from fruiting wood. Snip them off immediately. In summer, thin out fruit clusters to 3-4 apples per spur to ensure larger, higher-quality harvests. You'll notice the tree's structure becoming more defined each year, with branches naturally conforming to the trellis.
💧 Step 4: Support and Protect the Tree Long-Term
As your apple tree matures, the trellis will bear its weight. Check annually for loose or sagging supports and tighten as needed. If using wood, seal or paint the frame every 2-3 years to extend its life. For heavy fruit loads, add additional horizontal supports mid-season to prevent branches from bending under the weight. I like to weave twine through the trellis grid in early spring—this gives the tree extra stability while still allowing flexibility.
In winter, wrap the trellis and tree in burlap to protect against wind and frost. Apple trees trained on espaliers are more vulnerable to cold damage because their branches are spread out. If you live in a Zone 5 or colder, consider insulating the south side of the trellis with straw or foam board during extreme cold snaps. You'll see the difference in spring when the tree bursts into leaf without winter damage.
Tips & tricks for perfect espalier apple tree trellis
Transforming your orchard into a space-saving masterpiece takes more than just assembling a frame—it’s about understanding the subtle cues your tree will give you along the way.
Material Matters: Galvanized metal or treated wood are your best bets for durability, but if you're working with a budget, cedar or redwood can also resist rot and insects. The key is to avoid pressure-treated wood that contains copper-based preservatives—these can leach into the soil and harm your tree's roots over time. For the 4-foot height, make sure your vertical posts are firmly anchored at least 12 inches deep to prevent leaning as the tree grows.
Training Timing: Early spring is ideal for pruning and shaping your tree, but don't wait until the buds are swelling—this can stress the tree. The 4-6 week window for new growth to appear after training is your best indicator that you're on the right track. If you notice new shoots emerging earlier, it means your tree is healthy and ready for more guidance. Conversely, if growth is delayed, you may need to adjust the tree ties or provide more sunlight.
Pruning Precision: When you're thinning fruit clusters to 3-4 apples per spur in summer, focus on the largest, healthiest apples first. This not only ensures better-sized fruit but also prevents overcrowding, which can lead to smaller, misshapen apples. Use sharp pruning shears to make clean cuts just above a bud or lateral branch—this encourages the tree to direct its energy where you want it. Remember, every cut is a conversation with your tree, so think twice before you snip.
Winter Protection: Burlap is your best friend in winter, but don't just wrap it loosely—secure it tightly around the trellis and tree to prevent wind from tearing it away. For Zone 5 or colder, insulating the south side of the trellis with straw or foam board can make a world of difference. The goal is to create a microclimate that shields the tree from harsh winds and radiant heat loss, helping it retain moisture and energy for the next growing season. Think of it as giving your tree a cozy winter coat.
Pro Tips for Espalier Apple Tree Trellis
- Transforming your orchard into a space-saving masterpiece takes more than just assembling a frame—it’s about understanding the subtle cues your tree will give you along the way.
- Material Matters: Galvanized metal or treated wood are your best bets for durability, but if you're working with a budget, cedar or redwood can also resist rot and insects.
- Training Timing: Early spring is ideal for pruning and shaping your tree, but don't wait until the buds are swelling—this can stress the tree.
Frequently asked questions
What’s the best time of year to plant an espalier apple tree?
Plant your espalier apple tree in early spring (just as buds swell) or late fall (6–8 weeks before frost). This gives roots time to establish before extreme temperatures. Avoid planting in summer—heat stress slows root growth. For container-grown trees, you can plant year-round, but spring/fall still offer the best success rates!
How often should I prune an espalier apple tree?
Prune twice a year: lightly in late winter (before buds break) to shape the framework, and again in summer (after harvest) to remove suckers and encourage fruiting spurs. Use sharp bypass pruners and disinfect cuts with rubbing alcohol to prevent disease. Pro tip: Aim for an open center—this improves airflow and sunlight penetration!
Can I use a DIY trellis instead of buying one?
DIY trellises work great—try wooden lattice panels, metal grid frames, or even repurposed fencing. Key requirements: sturdy (to support 20–30 lbs of fruit), adjustable (for tree growth), and corrosion-resistant (if outdoors). Paint or seal wood to extend its lifespan. Bonus: Add hooks or ties for easy training!
Why aren’t my espalier apples ripening evenly?
Uneven ripening often stems from inconsistent sunlight or poor pollination. Check your tree’s placement—it needs 6+ hours of direct sun daily. If flowers didn’t set fruit, hand-pollinate with a paintbrush or plant a second variety nearby. Overcrowded branches can also block light; thin out dense growth. Patience helps! Dwarf varieties may take 2–3 years to bear fruit reliably.
Do espalier apple trees need special care in cold climates?
Yes! In freezing zones (USDA 3–5), winter protection is key:
- Wrap the entire trellis in burlap or frost cloth after leaf drop.
- Mulch the base with straw or wood chips (3–4 inches deep).
- Choose cold-hardy varieties like ‘Liberty’ or ‘Enterprise.’
- Avoid pruning in late winter—wait until after the last frost.
Wrapping up and next steps
Transforming your space with an espalier apple tree trellis isn’t just about saving room—it’s about blending creativity with practicality! 🌳 With the right materials, patience, and a dash of artistic flair, you’ve got everything you need to cultivate a stunning, space-efficient orchard.
Whether you’re a seasoned gardener or a beginner, the key is to start small, stay consistent, and enjoy the process.
Ready to take the next step? Sketch your design, gather your tools, and begin shaping your trellis today! Your future apple harvest—and your neighbors’ envy—awaits. 🍏✨