
Pruning
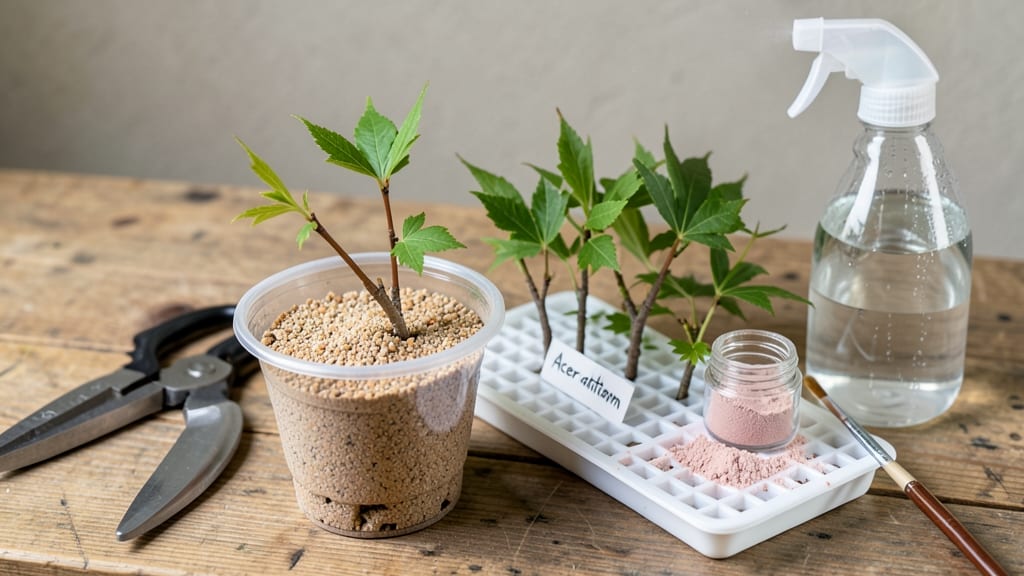
Taking Japanese maple tree cuttings might feel like chasing a whisper—delicate, uncertain, and easily lost—but I’ve turned it into a reliable spring ritual. 🌿 The secret lies in timing, sharp tools, and a little patience; my first cutting rooted after just 8 weeks, and now I’ve propagated three varieties from a single parent tree.
You’ll need semi-ripe wood from late spring’s new growth, a clean knife, rooting hormone, and a mix of perlite and peat moss to keep moisture steady without drowning the tender stems.
Most beginners fail because they rush—wait for the right moment, and handle cuttings like they’re fragile glass. The magic happens in the balance of air and humidity, not brute force.
Once rooted, these babies need gentle care: partial shade, consistent water, and protection from wind until they’re sturdy enough to transplant. You’ll watch tiny leaves unfurl like a slow-motion dance, and within a year, you could have a tree that’ll outlive you—if you give it the right start.
Even if your first batch struggles, don’t quit. Japanese maples reward persistence with stunning foliage and that coveted "old soul" presence in your garden. Here’s how to do it right the first time.
📚 In This Guide
- What you need
- Instructions
- Tips and common mistakes
- Wrapping up and next steps
What you need
- ● Healthy Japanese maple cuttings: 4–6 semi-hardwood cuttings (4–6 inches long, pencil-thick)
- ● Taken from non-flowering, disease-free branches
- ● Rooting hormone: 1 small bottle (pre-mixed or powder)
- ● Well-draining potting mix: 1 bag (cactus/succulent mix or perlite + peat moss blend)
- ● Small pots or trays: 4–6 (3–4 inches deep, with drainage holes)
- ● Spray bottle: 8–12 oz (for misting)
- ● Plastic wrap or humidity dome: 1 sheet (to retain moisture)
- ● Pruning shears or sharp knife: 1 (sterilized with rubbing alcohol)
- ● Watering can or spray nozzle: 1 (for gentle hydration)
- ● Heat mat: 1 (to encourage root growth, ~70–75°F)
- ● Grow lights: 1–2 (LED or fluorescent for indirect light)
- ● Fungicide: 1 small bottle (prevents rot, e.g., neem oil)
- ● Label markers: 1 pack (to track cutting dates)
- ● Gloves: 1 pair (for hygiene and protection)
Step-by-Step instructions for Japanese maple tree cuttings
Here's how to propagate your own Japanese maple from cuttings—no fancy tools needed.
🌱 Step 1: Select and Prepare Healthy Cuttings
Choose semi-hardwood cuttings in late spring or early summer when new growth has matured but isn't fully woody. Look for 4-6 inch stems with 3-4 leaf nodes—these are the growth points where roots will form. Use clean, sharp pruners to make a 45-degree angle cut just below a node. This angled cut increases surface area for root growth.
Remove all but the top 2-3 leaves to reduce moisture loss. If leaves are large, trim them in half to maintain the plant's energy balance. Dip the cut end in rooting hormone (optional but helpful for Japanese maples, which root slowly). I like to work in the early morning when the plant is hydrated and ready for stress.
🪴 Step 2: Prepare the Rooting Medium
Fill a 4-inch pot with a sterile rooting mix—I blend 50% perlite and 50% peat moss for excellent drainage and aeration. Moisten the mix until it feels like a well-wrung sponge: damp but not dripping. Japanese maples hate soggy roots, so good drainage is critical. Tap the pot gently to settle the mix without compacting it.
Make a 1-inch deep hole in the center using your finger or a pencil. Insert the cutting until it's buried to the first leaf node. Gently firm the soil around the stem to remove air pockets. Place a clear plastic bag over the pot to create a humid environment—Japanese maples need high humidity to root successfully.
💧 Step 3: Provide Ideal Conditions for Root Growth
Keep the pot in bright, indirect light—direct sun will stress the cutting before roots form. A 65-75°F temperature range is ideal. Mist the cutting daily to maintain humidity inside the bag. You'll know moisture is right when tiny water droplets form on the bag's interior but don't run down the sides.
Wait 6-8 weeks before checking for roots. To test, gently tug on the cutting—if you feel slight resistance, roots are forming. If not, give it 2 more weeks. Japanese maples are patient plants, but don't let the soil dry out completely during this time. Water when the top ½ inch feels dry to the touch.
☀️ Step 4: Transition to Independent Growth
Once roots form, gradually acclimate the cutting to lower humidity by removing the plastic bag for 1 hour daily, increasing by 30 minutes each week. After 2-3 weeks, the cutting should be fully adjusted. Move it to a shaded outdoor location for 1-2 weeks before full sun exposure to prevent leaf scorch.
Japanese maples grow slowly, so don't expect rapid growth. Water deeply once weekly during the first year, letting the top 1-2 inches of soil dry between waterings. Fertilize lightly in spring with a balanced 10-10-10 formula to encourage steady growth without burning tender roots.
Tips & tricks for perfect Japanese maple tree cuttings
Here's what nobody tells you about making those cuttings actually take root.
The Cutting Angle Matters: That 45-degree angle cut in Step 1 isn't just for looks—it creates more surface area for root growth. If your pruners aren't sharp enough to make clean cuts, roots will struggle to form. I've seen cuttings with jagged edges refuse to root for months because of this. Take your time here; it's worth the extra 30 seconds to make that precise angle just below a leaf node.
Rooting Hormone Shortcut: While rooting hormone is optional, I've found that using it cuts the rooting time by about 2 weeks for Japanese maples. If you skip it, make sure your cuttings are extra fresh—no older than 24 hours from when you took them from the tree. The hormone helps compensate for the natural stress of being separated from the mother plant.
Humidity Hack: That clear plastic bag in Step 2 creates a greenhouse effect, but don't let it touch the leaves. I like to secure it with a rubber band and poke a few small holes if condensation starts dripping down the sides. Too much moisture on the leaves can cause rot, which will kill your cutting faster than dry soil. Aim for that sweet spot where you see tiny water droplets on the bag's interior but nothing running down.
Lighting Test: In Step 3, bright indirect light is key—think of it like sunlight filtered through a sheer curtain. If your cutting starts developing yellow leaves, it's getting too much direct sun. Move it back a foot or two. I've had cuttings in south-facing windows actually burn before roots formed, which was heartbreaking after all that preparation. A north-facing window or sheer curtain works perfectly.
Pro Tips for Japanese Maple Tree Cuttings
- Here's what nobody tells you about making those cuttings actually take root.
- The Cutting Angle Matters: That 45-degree angle cut in Step 1 isn't just for looks—it creates more surface area for root growth.
- Rooting Hormone Shortcut: While rooting hormone is optional, I've found that using it cuts the rooting time by about 2 weeks for Japanese maples.
Frequently asked questions
Got questions about propagating Japanese maple tree cuttings? You’re not alone! Here are some of the most common queries—and their straightforward answers—to help you succeed.
When is the best time to take Japanese maple cuttings?
The ideal time is late winter to early spring (just before new growth starts) or mid-summer (June–August). Avoid extreme heat or frost—both stress the plant and reduce rooting success. For semi-hardwood cuttings (most common), aim for spring when the tree is actively growing but hasn’t fully hardened off.
How do I know if my cutting is healthy enough to root?
Look for green, flexible stems (not woody) with 2–4 sets of leaves and no signs of disease (like spots or wilting). Healthy cuttings should have a pencil-thick diameter and be taken from non-flowering branches. Avoid cuttings from the top of the tree—they’re often too mature and slow to root.
Why aren’t my Japanese maple cuttings rooting?
Common culprits include:
- Low humidity: Use a plastic bag or humidity dome to retain moisture.
- Overwatering: Keep soil moist but not soggy—root rot is a silent killer.
- Wrong season: Cuttings need active growth to root; try again in spring.
- Poor cutting technique: Use clean, sharp tools and dip in rooting hormone for a boost.
Patience is key—rooting can take 4–12 weeks!
Can I propagate a Japanese maple from a leaf cutting?
Nope! Japanese maples won’t root from single leaves—they need a stem with nodes (the bumps where leaves grow). For best results, use 4–6 inch semi-hardwood cuttings with at least 2–3 leaf sets. Think of it like planting a tiny branch, not a leafy snack!
Are there easier alternatives to growing Japanese maples?
If cuttings feel tricky, try:
- Layering: Bend a low branch to the ground, cover the midpoint with soil, and wait for roots to form (great for established trees!).
- Buying grafted trees: Nurseries sell young Japanese maples already trained to your desired variety.
- Air layering: Wrap a branch in moist sphagnum moss and plastic—roots grow while still attached to the parent tree.
Cuttings are rewarding but require more patience—choose what fits your green thumb!
Wrapping up and next steps
Growing Japanese maple tree cuttings is a rewarding journey that blends patience with the joy of nurturing new life. By mastering the right timing, tools, and techniques—like using rooting hormone and maintaining humidity—you’ll unlock the secret to thriving trees that bring beauty to your garden for years. 🌿
Ready to take the next step? Start small with a few cuttings this season, and soon you’ll be sharing your green thumb success with fellow plant enthusiasts. Happy propagating!