
Pruning
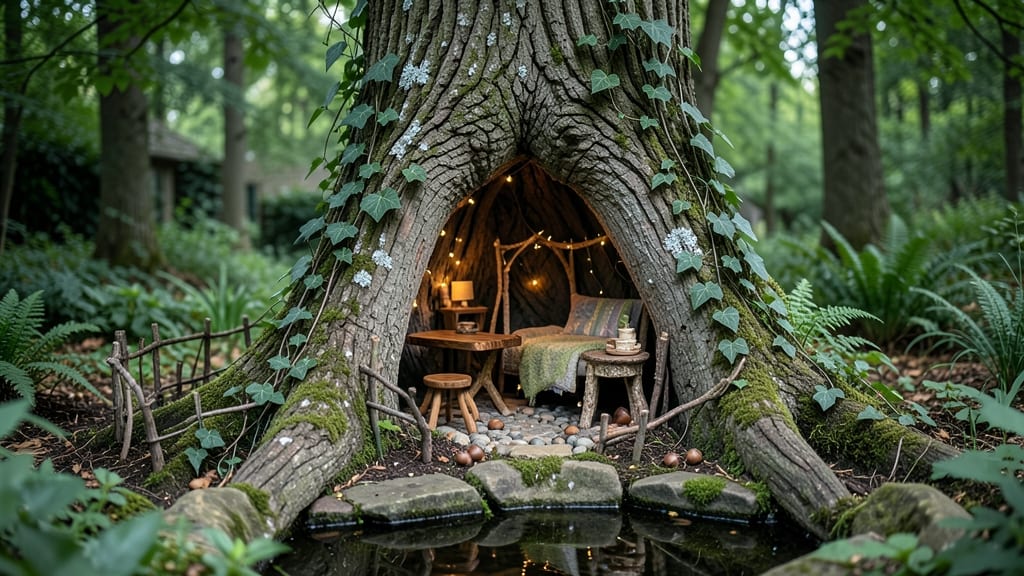
Your garden just got its own magical hideaway. ✨ A tree trunk fairy home transforms ordinary bark into a storybook retreat, blending whimsy with nature—no green thumb required.
I built mine last spring using a hollowed-out stump and a few thrift-store treasures, and now it’s the coziest spot in the yard where bees and butterflies linger longer than they used to.
The secret lies in simplicity: natural materials like moss, twigs, and acorn caps create the foundation, while tiny furniture (think mini chairs or mushroom stools) adds personality. Place it near shrubs or under a dappled tree for shade, and watch your garden feel alive with hidden charm.
Even the most skeptical neighbors will pause to smile at the tiny door or flickering solar-powered lantern.
By the time you’re done, you’ll have a year-round decoration that evolves with seasons—spring blooms peeking from the roof, autumn leaves piling up like a fairy’s blanket, and winter frost dusting the edges.
It’s not just decor; it’s a conversation starter and a haven for pollinators, all wrapped in a story waiting to unfold.
Works for any yard, from city balconies to sprawling backyards. Here’s how to bring the magic home—no fairy dust required, just creativity and a little patience.
📚 In This Guide
- What you need
- Instructions
- Tips and common mistakes
- Wrapping up and next steps
What you need
- ● Tree trunk or hollow log: Choose a sturdy, weathered trunk (6–12 inches in diameter) or a hollow log with natural openings.
- ● Natural roofing: Flat stones, bark slices, or moss (to create a cozy overhang).
- ● Decorative elements: Acorns, pinecones, or small pebbles (for pathways or borders).
- ● Twigs or small branches (to craft furniture, like tiny stools or beds).
- ● Dried flowers or petals (for a fairy garden touch).
- ○ Adhesive (optional but helpful): Non-toxic, outdoor-safe glue (like E6000) to secure lightweight items.
- ● Pruning shears or a small saw: For trimming branches or carving safe entryways (if needed).
- ● Gloves and safety goggles: For handling rough materials.
- ● Small shovel or trowel: To dig a shallow base or level the area.
- ● Spray bottle with water: To keep moss or delicate decorations fresh.
- ● Sunlight & patience: A spot with dappled shade (fairies love mystery!).
- ● Fairy lights or solar-powered LEDs (for a glowing nighttime effect).
- ● Miniature figurines (like tiny mushrooms or gnomes).
- ● Natural dyes (e.g., beet juice for staining wood) for a rustic look.
- ● Birdseed or wildflower seeds (to attract pollinators to your fairy’s garden).
Step-by-Step guide to building tree trunk fairy homes
Here’s how to craft magical miniature dwellings that blend seamlessly with nature.
🪴 Step 1: Select and Prepare Your Tree Trunk
Choose a small, hollowed-out tree trunk or a clean, weathered log with natural crevices—these provide the perfect foundation for a fairy home. If using a solid log, carve a shallow entrance hole with a small hand saw or drill bit (about 2-3 inches wide). Sand rough edges to prevent splinters and create a smooth surface for your fairy’s comfort.
I like to position the entrance on the north or east side of the trunk to shield it from harsh afternoon sun. This also mimics natural sheltering behaviors in woodland creatures. If your trunk has existing holes or cracks, leave them—they’ll add character and serve as hidden pathways for your fairy’s tiny world.
🌿 Step 2: Gather and Arrange Natural Decor
Collect moss, lichen, acorns, pinecones, and small pebbles from your garden or a nearby wooded area. These elements will bring texture and realism to your fairy home. Press moss into crevices and around the entrance to create a cozy threshold. Use hot glue or natural adhesives (like diluted wood glue) to secure larger pieces, like pinecones, which can serve as roof tiles or decorative accents.
For extra whimsy, add tiny twigs to form a miniature fence or gate around the entrance. I often arrange acorn caps in a circular pattern near the door—fairies love a welcoming path! Avoid overcrowding; leave space for your fairy to move about and explore.
☀️ Step 3: Add Whimsical Touches and Lighting
Fairy homes come to life with miniature furniture and soft lighting. Use toothpicks, twigs, or thin branches to craft tiny chairs, tables, or even a hammock. For lighting, place battery-operated fairy lights (with warm white bulbs) inside the trunk or weave them around the exterior. If you’re crafting for daytime enchantment, add glitter or iridescent paint to surfaces for a magical shimmer.
Here’s the thing—fairy homes thrive with subtle details. I once added a miniature mushroom cluster near the entrance, and it instantly transformed the space into a woodland retreat. For an extra touch, sprinkle biodegradable glitter or crushed eggshells around the base to mimic fairy dust.
⏰ Step 4: Place and Maintain Your Fairy Home
Position your fairy home in a shaded, sheltered spot in your garden, such as beneath a larger tree or near a bush. This protects it from heavy rain, direct sunlight, and strong winds. If placed in a visible area, fairies will feel safe to visit! Check the structure every few weeks to ensure moss stays moist and decorations remain secure.
To keep the magic alive, refresh the decor seasonally. In spring, swap out dried leaves for fresh moss. In autumn, add tiny pumpkins or gourds for a seasonal touch. Avoid using non-biodegradable materials—fairies prefer natural, earth-friendly creations that blend into their woodland home.
Tips & tricks for perfect tree trunk fairy homes
A few clever touches can transform a simple log into a magical fairy haven that feels alive. Here's how to elevate your woodland crafting game.
Nature's Foundation: When selecting your tree trunk, look for one with natural bark patterns and existing holes—they create instant character. If you're carving a new entrance in Step 1, use a small hand saw to create clean edges, then sand thoroughly to prevent splinters. Pro tip: Place a small piece of burlap or moss near the entrance during construction to catch any debris and maintain that natural aesthetic.
Seasonal Realism: The key to making your fairy home feel authentic lies in seasonal details. In Step 2, when arranging your natural decor, consider the time of year. For spring, add fresh moss and tiny wildflowers>; for autumn, incorporate miniature leaves and acorns>. I once created a winter version using frosted twigs and pine needles>—the contrast with snow made it magical. Always use what you find locally to keep it natural and sustainable.
Lighting Magic: When adding lighting in Step 3, warm white fairy lights create the perfect ambiance, but placement matters. Weave them through natural crevices or tuck them behind moss to mimic hidden glow. For daytime sparkle, use biodegradable glitter> sparingly—just a pinch goes a long way. I've found that placing lights near the entrance creates a welcoming "fairy door" effect that draws the eye.
Maintenance Secrets: In Step 4, the "every few weeks" check isn't just about appearance—it's about preserving your fairy's habitat. Keep moss damp by lightly misting it with water (not soaking). For extra protection, place your fairy home on a small wooden base> to elevate it slightly and prevent moisture buildup. This simple step can extend your creation's lifespan by months.
Pro Tips for Tree Trunk Fairy Home
- A few clever touches can transform a simple log into a magical fairy haven that feels alive.
- Nature's Foundation: When selecting your tree trunk, look for one with natural bark patterns and existing holes—they create instant character.
- Seasonal Realism: The key to making your fairy home feel authentic lies in seasonal details.
Frequently asked questions
Got questions about creating your own tree trunk fairy home? You’re not alone!
Here are some of the most common queries—and their magical solutions.
What’s the best type of tree for a fairy home?
Avoid trees with smooth bark (like birch or maple) or those that produce sap (birch, pine). Instead, opt for rough-barked trees like oak, beech, or apple—ideal for carving and securing materials. Dead or hollow trees work too, but ensure they’re stable and safe for kids/pets!
How long does it take to build one?
For beginners, a simple fairy home takes 1–3 hours with pre-cut materials. Advanced designs (with bridges, doors, or lighting) may need 4–6 hours. Pro tip: Work in short bursts—fairy magic feels better when you’re not rushed!
Can I use regular nails or screws?
Not ideal! Nails can damage bark and harm the tree. Instead, use stainless steel screws (1–2 inches long), hidden under decorative elements, or opt for non-invasive adhesives (like E6000) for lightweight materials. Always pre-drill holes to avoid splitting!
What if my fairy home gets rained on?
Seal wood with non-toxic outdoor varnish or acrylic sealer to protect against moisture. For extra durability, elevate the base with small rocks or a shallow tray to prevent rot. Bonus: Rain adds a "enchanted" patina to your creation over time!
What are some easy alternatives if I don’t have a tree?
No tree? No problem! Try these:
- Stumps or logs (paint or carve directly into them).
- Terracotta pots (stack or glue together for a "tree-like" base).
- Pallet wood (sand and assemble into a mini fairy village).
- Moss-covered rocks (use as a natural "foundation").
Get creative—fairies love resourcefulness!
Wrapping up and next steps
Creating a tree trunk fairy home isn’t just about crafting—it’s about sparking joy and magic in your garden! 🌿✨ Whether you’re a seasoned pruner or a beginner, this project lets your creativity shine while giving fairies (or kids!) a cozy new hideaway.
The best part? Every hollowed-out trunk tells a story, blending nature’s charm with your personal touch.
Ready to turn your garden into a fairy paradise? Grab your tools, gather your supplies, and start small! Try one section at a time, or go all out—either way, your outdoor space will thank you. Happy crafting!