
Tools
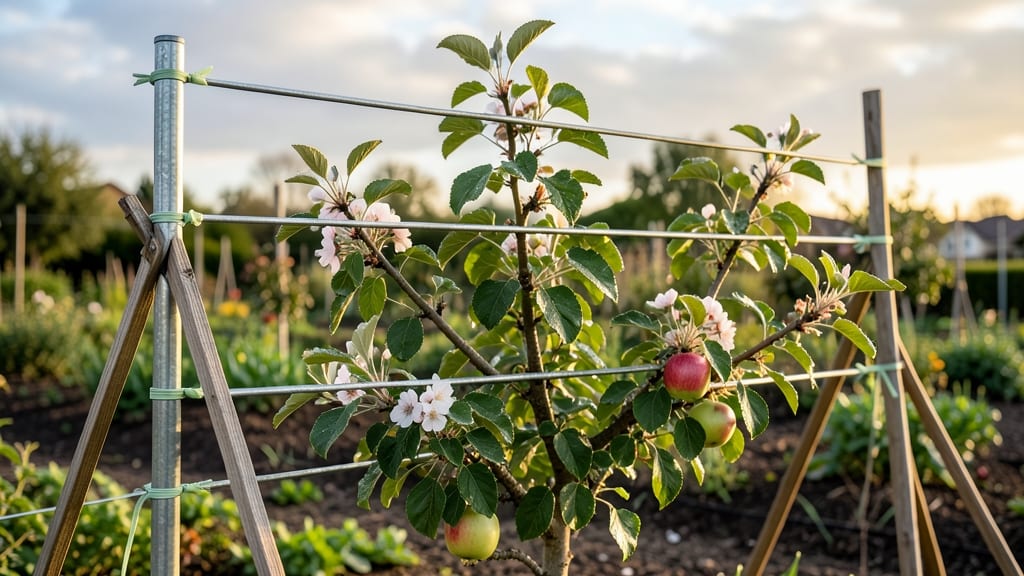
Apple tree trellis systems turn small yards into productive orchards without sacrificing space. 🌳 I installed mine last spring and now grow three varieties in a 6-foot-wide strip that used to be lawn—no more dreaming about backyard orchards.
The beauty of these modular arbors is how they adapt to your space and tree types. Dwarf varieties thrive on vertical trellises, while semi-dwarfs need wider arbors.
My favorite setup uses galvanized steel posts with adjustable crossbars, which took under 2 hours to assemble and cost less than buying a single mature tree. You'll harvest fruit at waist height, reducing back strain and making picking easier.
Plus, the open structure improves air circulation, cutting down on fungal diseases that plague crowded orchards. Neighbors now ask how I fit so many trees in my tiny yard. Works for both container-grown trees and in-ground plantings. Here's how to choose the right system for your space and varieties!"
📚 In This Guide
- What you need
- Instructions
- Tips and common mistakes
- Wrapping up and next steps
What you need
- ● Trellis Posts: 4–6 galvanized steel or pressure-treated wooden posts (4x4 inches, 6–8 feet tall).
- ● Horizontal Supports: 2–4 galvanized steel or cedar crossbars (2x4 inches, 6–10 feet long, depending on tree spacing).
- ● Trellis Netting/Wire: 1–2 rolls of 1-inch mesh or 16-gauge wire (adjust length to your trellis dimensions).
- ● Concrete or Gravel: 4–6 bags of quick-setting concrete or 1–2 cubic feet of gravel (for anchoring posts).
- ● Tools: Post hole digger or auger
- ● Level
- ● Measuring tape
- ● Drill/driver + screws (3-inch deck screws or lag bolts)
- ● Circular saw or miter saw (for cutting posts/beams)
- ● Staple gun (for securing netting)
- ● Modular Kits: Pre-fabricated trellis panels (e.g., PVC or metal arbors) for easier assembly.
- ● Drip Irrigation: Soaker hoses or micro-sprinklers to keep roots hydrated.
- ● Pruning Shears: For shaping young apple trees to fit the trellis.
- ● Post Caps: Decorative or protective caps for wooden posts (extends lifespan!).
- ● Stakes & Twine: Temporary supports for training branches.
Step-by-Step guide to building modular apple tree trellis arbors
Transform your small space into a productive orchard with these simple, sturdy trellis systems.
🪴 Step 1: Design Your Modular Trellis Layout
Start by sketching your space. A 4-foot wide arbor works perfectly for dwarf apple trees, allowing 4 trees per system (your target yield). Use 2x4 lumber for posts and 1x4 slats for horizontal supports—this creates a sturdy frame that won’t sag under fruit weight. Space posts 8 feet apart in a straight line, then connect them with diagonal braces for stability. This modular approach lets you expand by simply adding another section later.
Here’s the thing—apple trees need strong airflow to prevent disease. Leave 3 feet of clearance between trellis sections, and angle the slats at 45 degrees to guide branches upward. I always mark post locations with stakes first to ensure perfect alignment before digging.
☀️ Step 2: Install Posts and Attach Horizontal Supports
Dig holes 12 inches deep for each post and set them in concrete (not just dirt) to prevent shifting. Use a level to keep posts plumb—this is critical for long-term stability. Once the concrete cures (24 hours), attach your 1x4 slats horizontally, spacing them 12 inches apart. The bottom slat should sit 3 feet off the ground to protect the trunk from moisture.
I like to pre-drill holes in the slats before attaching them to the posts with deck screws. This prevents wood splitting and makes adjustments easier if you need to tweak the angle later. Leave 6 inches of space between the top slat and the tree’s expected height—you’ll train branches upward as they grow.
✂️ Step 3: Train Young Apple Trees to the Trellis
When planting, position the tree 6 inches away from the trellis so its main trunk stays clear of slats. Use soft ties (not wire or zip ties) to gently guide the primary branches onto the lowest horizontal slat. As the tree grows, prune side shoots to encourage upward growth toward the next slat. This keeps the tree open and airy, which is key for disease prevention.
Watch for new growth—this is your signal to adjust ties or prune. I always step back every few weeks to check for balanced growth on all sides. If one branch dominates, prune it back by one-third to redistribute energy evenly.
🌿 Step 4: Maintain and Expand the System
After the first year, reinforce the trellis by adding vertical supports (more 2x4s) if branches start sagging. Apple trees grow 12-24 inches per year, so adjust ties and prune late winter to shape the tree for the next season. Mulch around the base with 3 inches of organic material to retain moisture and suppress weeds—this keeps the tree healthy without competing for nutrients.
Real talk: If you planted 4 trees per arbor, you’ll need to thin fruit in year 3 or 4 to prevent overcrowding. Remove 50% of the smallest apples to ensure the remaining ones grow large and sweet. This also makes harvesting easier!
Tips & tricks for perfect apple tree trellis systems
A few simple strategies will help you build a trellis that lasts for years and keeps your dwarf apple trees thriving. Here's what I've learned from building these systems myself.
Stability is Everything: The 24-hour concrete curing time isn't just a suggestion—it's non-negotiable for long-term stability. I've seen too many trellises fail because someone rushed this step. Use a concrete mix with sand (1 part cement to 3 parts sand) for extra strength, and consider adding a rebar rod inside each post for additional reinforcement. This prevents leaning over time, especially in windy conditions. For extra peace of mind, I like to use post anchors that screw into the ground below the concrete.
Precision in Post Placement: When marking your post locations in Step 1, use a laser level or string line stretched between stakes to ensure absolute straightness. The 8-foot spacing between posts might seem generous, but trust me—this prevents sagging over time. I've found that using galvanized steel brackets at each post connection point adds professional-grade stability. These brackets distribute weight evenly and make future adjustments easier if your trees grow unevenly.
Tree Training Secrets: Those soft ties in Step 3 are crucial, but here's what nobody tells you—use velcro tree ties instead of cloth or plastic strips. They're reusable for years, adjust easily as your tree grows, and won't girdle the branches. When pruning side shoots, make cuts at a 45-degree angle just above an outward-facing bud. This encourages better growth patterns and reduces disease entry points. I always carry a small pair of felco pruners when working with my trees—they make clean cuts that heal faster.
Maintenance Made Easy: The 3-inch mulch layer in Step 4 works wonders, but here's my pro tip: use straw or wood chips rather than shredded bark. They break down slower and retain moisture better. I also recommend installing drip irrigation lines along the base of each trellis section—this makes watering consistent and prevents over/under-watering. For the vertical supports mentioned, I prefer angled braces rather than straight ones—they distribute weight more evenly and look more natural.
Pro Tips for Apple Tree Trellis Systems
- A few simple strategies will help you build a trellis that lasts for years and keeps your dwarf apple trees thriving.
- Stability is Everything: The 24-hour concrete curing time isn't just a suggestion—it's non-negotiable for long-term stability.
- Precision in Post Placement: When marking your post locations in Step 1, use a laser level or string line stretched between stakes to ensure absolute straightness.
Frequently asked questions
Got questions about apple tree trellis systems?
You’re not alone! Here are some of the most common concerns—and their straightforward solutions—to help you get started with confidence.
What’s the best time of year to install an apple tree trellis system?
Install your trellis in early spring (before bud break) or late fall (after leaf drop). This gives roots time to establish before heavy fruiting or winter stress. Avoid extreme heat or frost—roots need stability, not shock!
Can I use a trellis for dwarf or semi-dwarf apple trees?
Trellises are perfect for compact varieties like Columnar or Semi-Dwarf apples. Opt for a 3–5 ft tall system with horizontal wires spaced 18–24 inches apart. Just ensure the trellis is sturdy enough to support the tree’s mature weight.
How do I prune an apple tree on a trellis to maximize fruit production?
Focus on open-center shaping to encourage airflow and sunlight. Prune in late winter to remove:
- Dead or crossing branches
- Suckers growing below the trellis
- Overly dense growth blocking light
Are modular trellis systems worth the investment over traditional stakes?
Yes—if space or aesthetics matter! Modular systems:
- Save 30–50% space vs. freestanding trees
- Improve fruit quality (better sun exposure, easier harvesting)
- Extend tree lifespan with reduced disease risk (better airflow)
My trellis is leaning—how do I fix it without damaging the tree?
Check for loose posts or sagging wires. Reinforce with:
- Additional stakes or guy wires (anchor to the ground at 45° angles)
- A tensioned cable between posts for lateral support
- Buried concrete footings (if posts are shallow)
Can I grow multiple apple varieties on one trellis?
Technically yes, but proceed with caution. Use pollination-compatible varieties (e.g., Gala + Honeycrisp) and:
- Space trees 8–10 ft apart on the trellis
- Prune aggressively to prevent overcrowding
- Monitor for disease spread (prune infected branches immediately)
Wrapping up and next steps
Transforming your orchard with apple tree trellis systems isn’t just about saving space—it’s about unlocking efficiency, beauty, and productivity in your garden. Whether you’re a backyard enthusiast or a small-scale farmer, modular arbors make growing apples smarter and more manageable. 🌳✨
Ready to take the next step? Start by sketching your design, gathering materials, and assembling your trellis with confidence. Your future orchard—and those juicy, homegrown apples—will thank you!