
Blooming
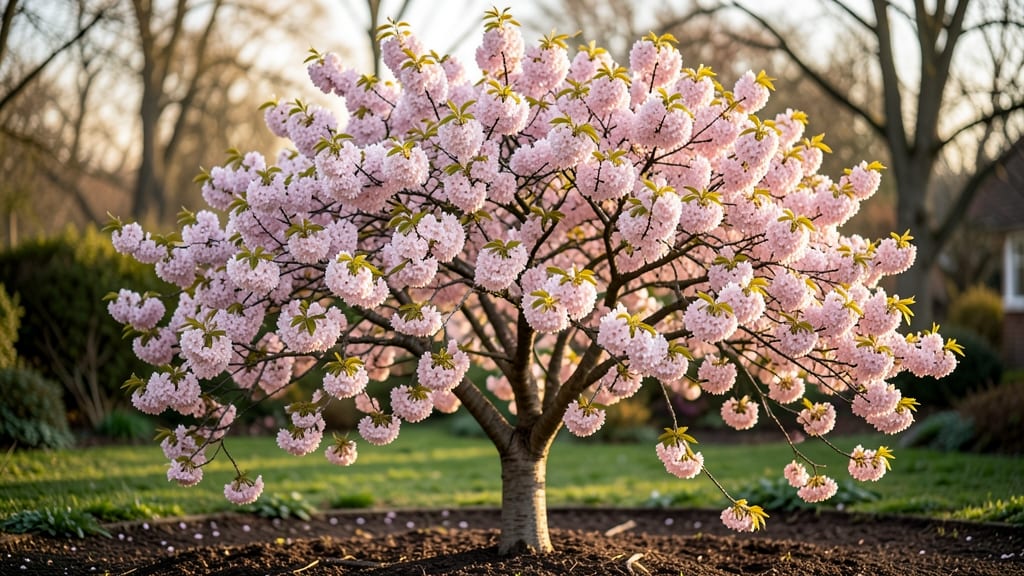
Planting a Yoshino cherry blossom tree means welcoming spring with a snowdrift of pink that lasts for weeks—not days. 🌸 I still remember the first time I saw one in full bloom, how the entire neighborhood stopped to admire the canopy of blossoms that seemed to float above the ground.
This isn’t just a tree; it’s a seasonal spectacle that transforms any yard into a postcard-worthy scene.
The Yoshino thrives in zones 5-8, where winters are cold enough to break dormancy but not so harsh they damage the bark.
It’s picky about sun too—plant it where it gets at least 6 hours of direct sunlight daily, preferably in a spot where the blossoms will be visible from a window or driveway.
The soil should drain well but stay moist, so amending heavy clay with compost makes all the difference.
Once established, this tree rewards you with minimal fuss—just consistent watering during the first year and an annual pruning to shape it and remove dead branches.
The real magic happens in spring, when those delicate pink blossoms appear before the leaves, creating a breathtaking display that lasts 1-2 weeks (sometimes longer if temperatures stay mild).
Beginner-friendly but not beginner-proof: Yoshino cherries are tougher than they look, handling urban pollution and drought better than many ornamental trees. With the right spot and a little care, you’ll have a tree that becomes the heart of your landscape for decades. Here’s how to make it thrive.
📚 In This Guide
- What you need
- Instructions
- Tips and common mistakes
- Wrapping up and next steps
What you need
- ● Yoshino cherry blossom tree (Prunus × yedoensis): 1 bare-root sapling (1–3 ft tall) or container-grown tree (3–5 ft tall)
- ● Ensure it’s disease-resistant and certified for your USDA hardiness zone (5–8)
- ● Planting site: Full sun (6+ hours of direct sunlight daily)
- ● Well-draining, slightly acidic soil (pH 5.5–6.5)
- ● Space: 20–30 ft apart for mature trees (or 10–15 ft for dwarf varieties)
- ○ Soil amendments (optional but helpful): Compost (5–10 lbs) or aged manure to enrich soil
- ● Sand or perlite (1–2 gallons) for improving drainage in clay-heavy soil
- ● Digging tools: Shovel or spade (for planting)
- ● Garden fork (to loosen compacted soil)
- ● Pruning tools: Bypass pruners (for clean cuts on small branches)
- ● Loppers (for thicker branches, ½–1 inch diameter)
- ● Hand saw (for large branches, 1–3 inches diameter)
- ● Mulch: 3–4 inches of organic mulch (wood chips, bark, or straw)
- ● Watering supplies: Garden hose with adjustable nozzle or watering can
- ○ Drip irrigation kit (optional, for consistent moisture)
- ● Timing: Best planting time: Early spring (before buds swell) or fall (6 weeks before first frost)
- ● Pruning: Late winter (dormant season) or early spring (post-bloom)
- ● Safety: Wear gloves (gardening or pruning gloves) to protect hands
- ● Sterilize tools with rubbing alcohol (70% or higher) to prevent disease spread
- ● Local regulations: Check city ordinances—some areas restrict large tree planting
Step-by-Step guide to planting and caring for Yoshino cherry blossom trees
Here's how to give your Yoshino cherry blossom the perfect start for stunning spring blooms.
🪴 Step 1: Choose the Right Planting Location
Yoshino cherry blossoms thrive in full sun with at least 6-8 hours of direct sunlight daily. I always look for the sunniest spot in the yard—these trees need warmth to set next year's flower buds. Avoid low spots where cold air settles, as frost can damage delicate blossoms.
Check the soil drainage before planting. Yoshino cherries hate soggy roots, so if your yard stays wet after rain, amend the soil with 3-4 inches of compost mixed into the planting hole. The hole should be twice as wide as the root ball but no deeper—planting too deep suffocates the roots and prevents proper nutrient uptake.
🌱 Step 2: Plant at the Correct Depth and Stake for Support
Gently remove the tree from its container and loosen any circling roots with your fingers. Position it so the top of the root ball sits 1-2 inches above ground level—this prevents settling that could bury the trunk over time. I always double-check by comparing the root flare (where roots meet trunk) to the surrounding soil line.
Backfill with native soil mixed with a slow-release fertilizer (follow package rates). Water deeply to settle the soil, then stake the tree if needed—young Yoshino cherries benefit from support during their first year. Use two stakes placed on opposite sides of the trunk, tied loosely with flexible tree ties to allow trunk growth.
☀️ Step 3: Water Deeply and Mulch to Retain Moisture
Water the newly planted tree deeply every 2-3 days for the first month, ensuring the soil is moist 12 inches down. You'll know it's enough when water runs out the drainage holes if planted in a container, or when the soil feels damp at that depth. Overwatering is just as harmful as underwatering—these trees need consistent moisture but hate soggy feet.
Spread 3-4 inches of mulch (wood chips or shredded bark) around the base, keeping it 6 inches away from the trunk to prevent rot. Mulch helps retain soil moisture and regulates temperature, which is especially important during hot summers. Replenish mulch annually to maintain this protective layer.
✂️ Step 4: Prune for Shape and Health in Late Winter
The best time to prune Yoshino cherries is late winter, just before buds swell. Remove any dead, diseased, or crossing branches first—these compete with healthy growth and can spread problems. I always start with the thinnest branches, working my way up to thicker ones, using clean, sharp pruners to make smooth cuts just outside the branch collar.
Shape the tree by opening the center to improve airflow, which reduces disease risk. Limit pruning to no more than 25% of the tree's canopy in any one year—heavy pruning weakens the tree and can reduce next year's blossoms. Seal larger cuts with pruning sealant to prevent disease entry points.
🌿 Step 5: Fertilize and Monitor for Pests Year-Round
Apply a balanced 10-10-10 fertilizer in early spring (just as buds swell) and again in early summer, following package instructions. Yoshino cherries respond well to regular feeding but don't overdo it—too much nitrogen promotes leafy growth at the expense of flowers. I always water the tree before applying fertilizer to prevent root burn.
Watch for common pests like aphids or scale insects, which can weaken the tree. Treat infestations early with neem oil or insecticidal soap, applying in the early morning when bees are less active. Healthy Yoshino cherries develop a strong, glossy leaf—if you notice yellowing or curling leaves, it's often a sign of pest activity or nutrient deficiency.
Tips & tricks for perfect Yoshino cherry blossom planting
These simple secrets will help you avoid common pitfalls and give your Yoshino cherry blossom the best possible start.
Sunlight Strategy: The 6-8 hours of daily sunlight mentioned in Step 1 is non-negotiable for those iconic pink blossoms. I always check sunlight patterns throughout the day—morning sun is great, but afternoon sun is even better for these trees. If your yard has afternoon shade, consider planting near a south-facing wall that reflects sunlight back onto the tree. This extra warmth helps set next year's flower buds, which form during summer.
Root Ball Inspection: Before planting, I always give the root ball a thorough inspection for any circling roots or root-bound conditions. These can strangle the tree's growth. If you find circling roots in Step 2, gently tease them apart with your fingers—this prevents the tree from growing in circles underground. Also, make sure the root flare (where roots meet trunk) sits just above soil level; this natural junction should never be buried.
Watering Wisdom: The deep watering every 2-3 days in Step 3 might seem like a lot, but it's crucial. I use a soil probe or long screwdriver to check moisture 12 inches down—this ensures the roots get the hydration they need. For container-grown trees, wait until water runs out the drainage holes before stopping. Overwatering is just as damaging as underwatering, so let the top 1-2 inches of soil dry between waterings during the first month.
Pruning Precision: When pruning in late winter (Step 4), I always make my cuts just outside the branch collar—the swollen area where the branch meets the trunk. This ensures the wound heals properly and prevents disease entry points. For larger branches, I seal the cuts with pruning sealant immediately after cutting. Remember, the 25% canopy rule is strict—pruning more than that can shock the tree and reduce next year's blossoms.
Pro Tips for Cherry Blossom Tree Yoshino
- These simple secrets will help you avoid common pitfalls and give your Yoshino cherry blossom the best possible start.
- Sunlight Strategy: The 6-8 hours of daily sunlight mentioned in Step 1 is non-negotiable for those iconic pink blosso...
- Root Ball Inspection: Before planting, I always give the root ball a thorough inspection for any circling roots or ro...
Frequently asked questions
Got questions about your Prunus × yedoensis (Yoshino cherry blossom tree)?
You’re not alone! Here are answers to the most common queries—from planting to pruning—so you can keep your tree thriving and stunning year-round.
How long does a Yoshino cherry blossom tree live, and how fast does it grow?
A healthy Yoshino cherry blossom tree can live 50–100 years with proper care! Growth is moderate—expect 12–24 inches per year in ideal conditions (full sun, well-drained soil, and consistent watering). Dwarf varieties grow slower (6–12 inches/year), perfect for smaller spaces.
When is the best time to prune a Yoshino cherry blossom tree?
Prune right after flowering (late April–May) to avoid cutting off next year’s blossoms. Never prune in late fall or winter—this can stimulate weak growth vulnerable to frost damage. Light shaping is fine, but avoid heavy cuts; these trees bloom on old wood.
Why aren’t my Yoshino cherry blossoms as vibrant as I expected?
Faded or sparse blooms often mean over-fertilizing (especially with nitrogen), poor sunlight, or stress from drought/root damage. Ensure your tree gets 6+ hours of sun daily and mulch well. If blooms are sparse, try a balanced 10-10-10 fertilizer in early spring (follow package instructions).
Can I grow a Yoshino cherry blossom tree in a pot, or does it need to be planted in the ground?
Yes! Dwarf Yoshino varieties (like ‘Shirotae’ or ‘Cloud’) thrive in 15–25 gallon containers with drainage holes. Use a well-draining potting mix and repot every 2–3 years. For in-ground planting, space trees 20–30 feet apart to allow airflow and prevent disease.
Are Yoshino cherry blossom trees messy? Do they drop petals or fruit?
Yes—expect a petal blizzard during peak bloom (2–3 weeks)! While beautiful, this can be messy. Place mulch or landscape fabric beneath the tree to contain debris. As for fruit? Yoshino trees produce tiny, inedible cherries that birds love but rarely drop messily.
How cold-hardy are Yoshino cherry blossom trees?
Yoshino cherries are USDA Zones 5–8, tolerating temps down to -15°F (-26°C). However, late spring frosts can damage buds. Plant in a sheltered spot or use frost cloth if your area has unpredictable freezes. Young trees benefit from winter mulch for extra protection.
Wrapping up and next steps
The Yoshino cherry blossom tree isn’t just a seasonal beauty—it’s a year-round investment in joy and elegance. With the right sunny spot, thoughtful pruning, and a little care, you’ll enjoy its delicate pink blooms and lush foliage for decades.
Now that you’re armed with pruning secrets and planting tips, why not plant one this spring? 🌸 Start small—whether it’s a sapling or a well-established tree—and watch your garden transform into a serene, blossom-filled haven!